This face is not finished yet. I was playing on one of my journals, with black gesso and my prismacolor pencil. When I started it, I had no idea of what type of face was going to apper but here she is.
Hello everyone. Have it has happen to you that you have no motivation or inspiration to craft and do art? I has had happen to me, and lots of times. So I have look for different ways to keep myself motivated; for example taking classes of my interest over the web, search YouTube for inspirational videos, re-visit my previous creations and looking for challenges where I can find motivation and inspiration.
Now, I now that taking classes require some investment (time and money wise) that cannot be afford all the time, at least I can't. That leaves me with the other options, which are free! This past few weeks have been weird for me; I kind of want to do something crafty and artistic but had no motivation or inspiration at all. Then I saw the 29 facces on September challenge on Ayala Art, Mixed Media Paintings, ACEOS blog and saw the light at the end of the tunnel ;).
The great thing about this kind of challenge is that other people are with you on it, it cost you no money and you can invest the time you want/can to. Also, they are great sources of inspiration and motivation, as well as, a great way to keep you practicing and improving your skills.
So here I am, with my first face for the 29 faces challenge; I know I'm 4 days "behind" schedule but it doesn't worries me. Why? Because I can create more than one face a day, they don't have to be a master piece or even a completed project. For me any face doodling counts as I am practicing techniques and improving my skills.
Here is a sketch I made in my handmade pocket sketch book, just for the fun of it and to practice some pencil blending using Gamsol (I'm new at it ;)).
So go ahead and find your source of inspiration and motivation, whether it is a class, challenge or video; don't stop yourself, hop on the adventure and have fun.
Created on my altered journal, this page spread took a couple of days, just because I only had the girl sketched but did not know what else to do. Suddenly the other day I got the inspiration, and this lovely dragon came to life; my second dragon ever.
For the dragon scales I used Distress crackle paint; then used soft pastels to color it. The girls was color with prismacolor pencils, spectrum noir alcohol markers, and Faber-Castell Pitt artist pens. For the suggested flower forest, I used Distress ink, acrylic paint and soft pastels.
Dragon's chivalry, as I have called this art journal page, has given life to the idea of making a challenge for the month of July, based on fantasy creatures. I want to try to create a fantasy creature every day. Right now I'm off by one, but it is okay; I can't wait to see what other magical creatures will come to life.
This are the latest art journaling pages I've done on my altered book. Here I have tried different mediums, without fear. I got the book at my local Goodwill for a $1 and started playing with it. The motivation to start an altered book/journal came from Jane Davenport's class, Supplies me. A wonderful class, where she shows how to use lots of art supplies. I got fearful and started trying all the supplies I have been piling and not using.
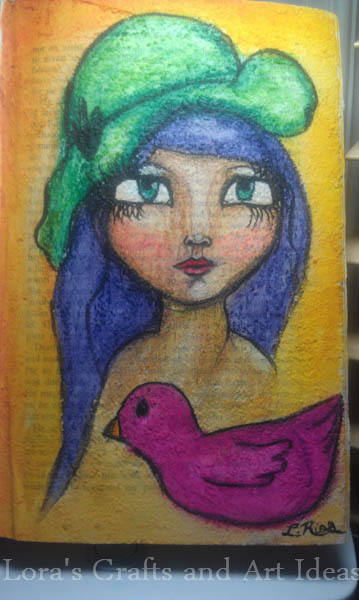
This girls was made over fiber paste with water-soluble oil pastels (Portfolio, from Crayola). I sketched her with india ink; trying not to worrying about mistakes, just letting my self loose and seeing what could happen. She is not perfect, and if I would have sketched her with pencil, I might have made a few changes for sure. However, my goal was to let it loose and have fun, instead of seeking perfection. I didn't have to apply much pigment since the surface was very textured. The pastels were blended with a water brush, they reacted beautifully. The only thing I found out is that I should have used some fixative, because after a couple of days, the pink on her cheek moved to another areas; also the colors started transferring to the opposite page. It has never happened to me before, so I guess it is do to the textured surface.
The next girl, was made over absorbent ground. It is used over gessoed surfaces to prepared the surface for watercolors and acrylics as well. It is very absorbent, and for me, the watercolors did not behave as on normal watercolor paper. I tried wetting the surface but it dried quite fast, so I feel that basically it was more of a wet on dry technique. For this one, I used TCW stencil (mini time travel), distress stains, india ink, acrylics, homemade glitter mists and watercolors. On this page I was practicing drawing arms, for the supplies me lesson. I really like this one, she is looking at the horizon waiting, for what? who knows. But it look serene and calm.
I really enjoyed the process of making these pages, they helped me with the art block I have lately. Welcome back my art muse!!!
A page from my Moleskine portrait journal, I loved and thoroughly enjoyed the process for this one. It took me more than one day but I don't regret it. This is the first time I used light modeling paste on any of my journals; I put it around the head and borders of the other page, to give texture and dimension. The modeling paste take some time to dry, so I just left it overnight to make sure it was dry before applying the blue paint. Also, added extra modeling paste after applying the acrylic paint and while it was wet. I did that, in order to create different tonalities. The face was made with Prismacolor pencils over a coat of clear gesso. Acrylic paint and ink were used on the rest of the pages; three-dimensional stickers complete the image. Writing on the right is a prayer to Jesus' mother, Mary.
The soft look of her eyes and the young and pure look of her face made me think of Virgin Mary, so I wrote down a beautiful prayer on the other page. This is one of my favorites pages; it is calming to look at her eyes, plus I can't stop touching all the textures on this pages.
Finally, I decided to be brave and try out alcohol markers. All thanks to Jane Davenport's class Supplies Me, it is a lovely class where she shows how to use almost every art supply out there. Since I new that we were going to learn how to use alcohol markers, I went crazy and bought a few (not really, I bought lots). My collection of markers is mainly composed of Promarkers, followed by the new kid in the block, the Spectrum Noir (very affordable); and last but not least a few (very few) Copics.
For the Copics, due to the fact that they are so expensive, I just bought a couple of skin tones. The Promarkers I have in a wide range of colors and also in skin tones. I also got the Spectrum Noirs in skin tones, but also earthy tones, cool and warm grey tone. So, yes I did expend a lot in a spam of 5 months, trying to get a sample of every alcohol marker I could. For the sake of clarifying, the Supplies Me class does not required you to have all the alcohol markers that are out there; it was my own decision to get at least a sample of most of them.
Alcohol markers are very blend-able, and all the brands mentioned above works together very well. As you can see on the portrait I made and called "Lola", they blend pretty good. Please, keep in mind this is the first time I play with them for real, so it is not flawless but not too bad either. It wasn't totally easy, and it took some time to get the feeling of it and start learning how the markers behave on the paper, and how they interact with each other. Coloring with alcohol markers, requires patience and time if you want to get decent results at the beginning of this journey. I realize how different the coloring technique is, in comparison to colored pencils (like Prismacolors). The building up of the shadows is quite different that what I am use to with the Prismacolors. Lola's face, arms and hair were colored with alcohol markers; while the background and dress were colored with watercolors and distress stain, respectively on Canson Fanboy paper. This shows, how alcohol markers are also a great addition to your mixed media supplies.
The process for making "Lola" was fun and instructive; and I will definitely keep practicing coloring with alcohol markers and use them more often on my mixed media journaling. Will you give it a try?
Here are the videos for two easy and beautiful mother's day cards. Unfortunately, I was too busy with grad school to make all the cards that I wanted to make and have the idea of what they were going to be. Anyway, hope you enjoy this two beautiful cards, that can also be a bit modify and use for other special occasions. Happy Mother's Day.
This is a quick post about some good deals on crafts and art
supplies. A.C. Moore has all the paper pads with 40% off, plus the new
Spectrum Noir alcohol markers for $7.99 (set of 6). I just re-stocked on
mixed media and pastel papers and added a few more colors to my new
collection of alcohol markers. Stickers, open source papers, clear and
wood stamps also have 40% off. Sharpie markers for 88 cents and some
Cricut cartridges on sale too; so this is a great time to go and stock
your art supplies.
If you go to their website you can get
a 40% and 50% coupons for one article at regular price. The 50% is only
good for this upcoming Saturday (May 5,2012). They also have other
great deals of stuff at 40% off. I'm not affiliated to A.C. Moore or
anything; I just thought it was good to let everyone knows.
Michaels
also have a 40% off coupon for one article at regular price; they also have had, for a while though, the distress crackle paint on clearance.
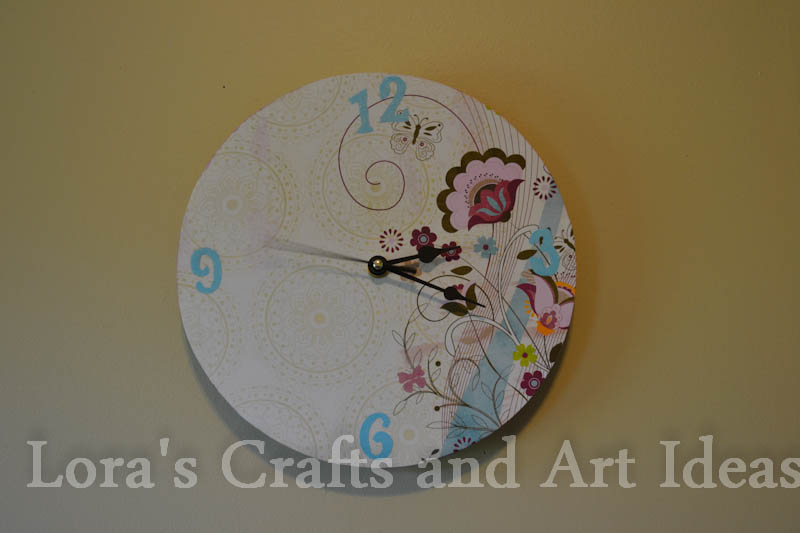
This idea have been in my head for a while, and finally I made it. A personalized wall clock, that is easy and fun to make; the best part kids can participate.
For this you will need:
1. pretty cardstok ( I used a BoBunny heavy cardstock "Sophie")
2. matte or gel medium ( you can use mod podge or any glue)
3. acrylic paint and brush
4. piece of round wood or plywood (or any shape you want your clock to be; mine is 10 inches in diameter)
5. clock mechanism
6. number stickers or rub-ons, markers or anything to make the numbers. I used embossing powder and embossing pen (VersaMarker watermark pen).
7. battery
I know that the clock mechanism can be a bit expensive, as well as, the wood panel depending on its size; a good alternative is visiting the kids section of your craft store or department stores and look for clock kits. I used a kit that I found at the kids craft section at my local Wal-Mart for just $10; which is a great deal.
In the video below you can see a time lap of how I made my clock, however below it are some tips and what I would have done in a different order, and think it would work better.
Tips:
1. Place the wood piece over the decorative paper and lightly trace its shape with a pencil. Make sure that you place the wood or your clock base covering the part of the design that you want as focal point in your clock.
2. Use a circle cutter (if your clock is circular) or scissors to cut out the paper.
3. Paint the borders before pasting the decorative paper.
4. Apply matte medium or any adhesive you are using, liberally on the wood surface and place your paper. Make sure you make the center whole in your paper prior to pasting it, it will help as reference to keep your paper center.
5. Add the numbers, using stencils, sticker, rub-on, markers or any way you like. (you don't have to add numbers if you don't want to).
6. Add the hanging piece on the back before installing the clock mechanism.
7. Install the clock mechanism and add the battery. The kits and even the separated mechanism comes with instructions on how to do it.
8. Hang it in the wall and enjoy it.
I really like this one, I was not aiming for a realistic portrait but for one that looked kind of "cartoony". It has lots of elements that I like, for example: colors, the greek column, egyptian looking eyes and jewelery. This was fun to do and I love how it looks.
I painted this the other day that i felt like painting but did not have a concrete idea of what to paint.
I just grabbed my acrylics, mediums and spatulas (the brush only for signing it) ,and started adding colors as they called my attention. I added some textures and played with it to my heart content.
This was a great exercise to relax and free my mind of all the stressful thinking I was having.
These are my first try at oil painting, and I have to say I'm really happy with them. The light and shadows might not be perfect but I kept "messing" (remember there are no mistakes with art) them every time I try to make something else. Anyway, got to say that I love the medium and plan on keep practicing with it. If any of you have any tips that would like to share with me, I will love to know them.
For those that haven't use oil paints yet, I recommend you to try this medium, and for a try you can just buy a $5 set of oil paints. If you don't like it, you didn't spend much on it, and if you do, while you get better you can keep using them and then gradually start moving up to very grade paints. Whatever you decide to do, have fun and happy painting!!!
I am really excited, this is my first attempt at carving my own stamp from one of my drawings, and guess what? I love it! I have made stamps with my Cricut but this is a whole new experience. I used the Speedball started kit, which I bought at Michael's with a 40% coupon (love coupons ;)). I already have lots of ideas for more stamps, since this is a great way to personalize, even more, all your projects. I recommend you to try it, believe it or not, it is pretty relaxing.